.png)
Course Landing Page
- Center for Teaching, Learning, and Technology
- Jul 7, 2025
- 9 min read
Updated: Jul 8, 2025
When you open your course, you may notice that the course landing page has a bunch of widgets. This guide will walk you through what they are and how to use them.
What is a Widget?
A widget tool or object that does one special thing. Each box you see on your Course landing page is a widget. Each one serves its own special focus.
To see your homepage from a student's perspective, click your name at the top of the page, then select "View as Student." To return to your own view, click your name again and then click the "X" next to "Viewing as Student."
Click on each widget's name below to learn more about it.
Announcements

Announcements appear at the top of your course landing page and display only the first few lines, with a “Read More” button to expand the message.
This tool is great for posting class updates, creating instructor presence, and inviting students to engage with other opportunities like webinars or volunteer opportunities.
What you need to know
Students will not get an email notification when you post an announcement unless they have turned on Brightspace notifications.
Once an announcement has been viewed, users can “dismiss” them so they no longer appear on their screen. This can be done by pressing the X button at the top right of the announcement. If you would like to see a dismissed announcement, you can click the “Show All Announcements” button at the bottom of the widget.
Basics features
You can post an announcement by clicking New Announcement on the course landing page or by going to the announcements tool in the Course Admin section of the class.
Intermediate features
Announcements can be set up with start and end dates. These are good if you want to write an announcement ahead of them, you can set it to show up on a specific day. Or if an announcement has information about an event, an end date can be used to make it disappear after the event has ended so it is no longer taking up real estate on your students’ screens.
Advance features
Announcements can be set up to use conditional releases so that only certain populations can see them. For instance, you can set an announcement to be revealed only after a student completes a certain assignment or so that only one group sees them.
Announcements can be set up with replace strings to create a more personalized experience for students.
Pro tip: Make your announcements eye-catching. If all you do is walls of text, students aren’t going to notice that you have posted an announcement. Try including an image in your announcement. It will appear to the left of the text in the preview, creating something eye-catching that will get your students attention.
Introductions

The Instructor Profile widget is designed to help students easily connect with their instructors and TAs. It displays information for anyone listed as an instructor or TA in your course's Classlist.
What you need to know
Students will only see the following information, which is pulled directly from your Brightspace profile. No other fields will display from your profile. Keep in mind that these details apply across all your courses:
Name
Profile picture
Business phone number (if you've added one and chosen to display it)
Homepage (if you've linked a website, like your faculty page or a personal site)
Email address
If there are instructors or TAs in your Classlist whom you don't want to appear on the widget, you can manually edit which individuals are shown. This setting is course-specific, so it won't affect other courses.
Add a custom course message: You can set a text-only message that will appear on the widget. Be aware that this message will not retain any special formatting or line breaks; Brightspace will display it as plain text. This message is also course-specific and won't carry over to other courses.
Quick Eval
Quick Eval is designed to make it easier for you to grade. Instead of navigating to the assignments or quizzes tab, you can see ungraded work directly on your course landing page.
What you need to know
Students cannot see this widget. Underneath their announcements widget, they see the Visual Table of Contents.
The Quick Eval widget only shows submissions in Brightspace. If you use an external learning tool such as Harmonize, student submissions will not show up here.
Course Overview

The course overview widget is a tool that gives an overview of how the students in your class are engaging with the course.
What you need to know
Students cannot see this widget. Underneath their introductions widget, they see the calendar.
The widget shows limited information on the landing page, but the links to additional data can be worth checking out.
Class Engagement
Basic Features

Get a high-level overview of how the class is doing
See the last time a student logged into the class.
Email students directly from this page by selecting individual students or the whole class.
Intermediate Features

Filter the data by clicking the bar(s) of the grade distribution chart to only show students whose current final grade is within that range. And/or click the [Number] students haven’t visited this course in the past 7 days to filter the list to just those who have not logged in in a while.
Pro tip: Use this data to follow up with students. Reach out to students who are struggling or who have not logged in for a while to offer assistance. Or reach out to the top-performing students just to let them know that they are doing a great job and that you have noticed their hard work.
Course Access
Basic Features
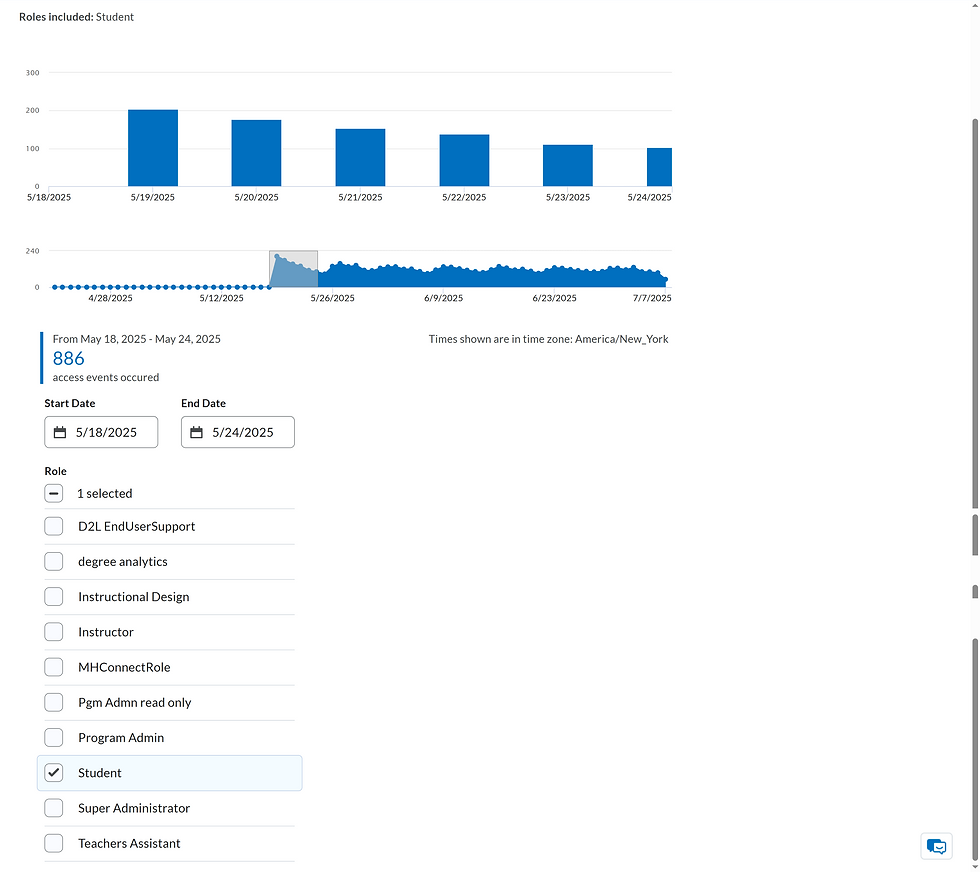
View statistics about how often your course has been accessed. The Course Access page presents graphical representations of course access, allowing you to quickly grasp overall engagement.
Filter the graphs by user type and date range. Customize the displayed data to focus on specific user groups (e.g., students, instructors) or time periods, providing more targeted insights.
Tool Access
Basic Features

The Tool Access tool provides a comprehensive overview of how various Brightspace tools are being utilized within your course. This data can help you understand student engagement with different features and inform your course design decisions.
The Tool Access page displays a breakdown of views for each Brightspace tool in your course, presented as a percentage of total views and the absolute number of views over the last 12 months. This gives you a quick snapshot of which tools are most and least frequently accessed.
Easily see which tools are most popular, such as "Content" and "Manage Files" in the provided example, indicating where students are spending most of their time.
In some Brightspace instances, you may be able to filter tool access data by user role (e.g., students, instructors). This helps differentiate how different user groups are interacting with the course tools.
Visual Table of Contents
The Visual Table of Contents (VTOC) is designed to help students easily track their progress through course content. While visible to both instructors and students, it's primarily intended to enhance the student learning experience. The VTOC displays how far a student has progressed in each content module and provides direct links to the course material.
What you need to know
Students can click the page icon at the bottom of a module card to be taken directly to their next unvisited content page within that module. This makes navigating your course content much easier.

By default, all module cards display your main course banner. It's important to know that Brightspace will crop these images to fit the card size rather than resizing them, and you can't control how they're cropped. The ideal size (so Brightspace doesn't crop your banner weird) is 1200 pixels x 360 pixels.
You can set custom banners for each module. The recommended size is 1200 pixels x 360 pixels. To update your module banners, please visit the module description for each module and add an image anywhere on the module description page.
Calendar

The calendar helps students by providing a centralized place to view and manage upcoming course work and important dates. It automatically populates with deadlines for various activities, helping everyone stay organized and on track.
What you need to know
The calendar automatically displays deadlines for assignments, quizzes, and other activities once a due date is set within Brightspace.
Students can download a course calendar and import it into personal calendar applications like Google Calendar or iCal. They can find directions for this on our student support site. Important Sync Note: If you add or change assignment due dates after a student has downloaded the course calendar to their personal calendar, those updates will reflect in Brightspace's calendar but will NOT automatically update in the student's personal calendar. Students would need to re-download the calendar to see the new information.
To make an assignment or activity appear on the calendar for students, you must assign it a due date in Brightspace.
Student Support

The Student Support widget is a resource designed to give students easy access to academic, personal, and technical support services. This widget is a fixed feature within your course and is not editable by instructors.
Course News
This widget creates a pop-up on your course landing page that appears every time a user logs in and accesses the page, unless they've dismissed it. It's an excellent tool for introducing your course, sharing important information, or providing a quick overview.

What you need to know
The pop-up will only appear for instructors until you add a course unit (formerly called a module) with the word "news" in its title. Once a "News" unit is added, the pop-up will appear for students the first time they enter the course.
The pop-up will reappear each time a user accesses the course landing page until they click the Dismiss button at the bottom of the pop-up. Closing the pop-up using the "X" will not dismiss it permanently.

If you've dismissed the pop-up and want to see it again, click the button in the Course News widget located on the bottom right of your course landing page.
If you add a new page to your "News" unit, the pop-up will reappear for all users (even those who previously dismissed it) until they dismiss it again. All pages within the "News" unit will be displayed in the pop-up.
Note: This widget is best for orientation-style information, not regular announcements.
Get a Pre-Made Welcome Page
The instructional design team has created a welcome message to help students get started. You can use this message as-is or edit it to be more specific to your class. Follow these directions to use it.
Updates
The Updates widget provides reminders for both students and instructors, though the information displayed differs based on user role. This widget cannot be edited by instructors.

What you need to know
Instructors cannot edit the content or settings of this widget.
Student View:
Shows students when they have new responses to their discussion board posts.
Shows students how many quizzes they still need to complete in the course.
Instructor View:
Provides a number of submitted assignments that still have to be graded
Provides information on any broken links detected within the course content.
Pro Tip: We recommend regularly checking this widget to ensure there are no broken links in your course.
My Course Evaluations
This widget provides a direct link to Watermark, our course evaluation system. For most of the term, it simply serves as a convenient access point to their site. However, when the official course evaluation period opens, it transforms into a crucial tool for encouraging student feedback.

What you need to know
During the term, the widget acts as a direct link to the Watermark system.
During the course eval period, a pop-up will automatically appear for students each time they enter the course asking them to complete the course eval. The pop-up will continue to appear every time until they complete their course evaluations.
Quiz Printer
This appears at the bottom of your class homepage and can be used to create printable versions of Brightspace quizzes. Only instructors can see this widget. Students will not be able to print their own copies of quizzes. This widget is intended for instructors to better support students who have an accommodation for hard copy quizzes (such as those with a concussion).

To use the widget, select the quiz, then select what you would like to include:
Answer key - shows the answers to the quiz. Do not select this if you are printing a quiz for student use.
Question labels - show the type of question underneath the question text (eg. multiple choice, multi-select, matching, etc.)
Quiz description - displays at the top of the quiz and shows the quiz description (if one exists in Brightspace) and any restrictions put on the quiz, such as time limit.
The quiz opens as a webpage. To print it, press CTRL + P on your keyboard (PC) or CMD + P for Mac users. Then select the printer you would like to send it to. Note: you could also choose to save it as a PDF using these keyboard shortcuts. Just select the Save as PDF option in the printer selection.